Raspberry Pi Cheat Sheet

About
This document is a collection of tasks that occured in many projects of the Interactive Media Lab of the Academy of Fine Arts Nuremberg. Use it as a reference or starting point for further reading as it is not intended to provide extensive tutorials.
Table of Contents
- How to install an operating system
- Prepare your installation before first boot
- The terminal
- Security
- Installing software
- Useful Software
- GPIO
- Autorunning a program
- Configuring default audio output from commandline
- Multi-channel audio over USB audio interface
- Links
How to install an operating system
The remains of this page assume that you are running Raspbian as operating system of your Raspberry Pi. In fact, However, there are several
operating systems running on a Raspberry Pi that conform to your needs in a better way.
For information of available operating systems and installation instructions,
please follow the links below on the website of the Raspberry Pi Foundation.
Prepare your installation before first boot
Enable SSH
SSH (Secure SHell) enables you to log into your Raspberry Pi remotely over network. Linux and MacOS come within SSH preinstalled. For Windows, please install a tool like PuTTy.
Create an empty file named ssh in the BOOT partition of your SD card after installing the Raspbian image.
SSH then will be enabled when you boot.
You can enable/disable SSH later using Raspbian's raspi-config tool.
> sudo raspi-configWhen your Raspberry Pi has booted and is connected to a network, you can open a remote terminal from a computer in your network with the SSH command. Change the IP address to the address of your Pi:
> ssh pi@192.168.0.42
Remember the default credentials for login:
User: pi
Password: raspberry
Setup Wifi
Before first boot, place a file named wpa_supplicant.conf in the BOOT partition of your SD card. The file must contain the following information. Make sure to use uppercase letters for country code and to have no spaces around the = symbols.
# File wpa_supplicant.conf (Raspbian Stretch)
country=DE
ctrl_interface=DIR=/var/run/wpa_supplicant GROUP=netdev
update_config=1
network={
       ssid="wlan-bezeichnung (ssid)"
       psk="passwort"
       key_mgmt=WPA-PSK
}/etc/wpa_supplicant/wpa_supplicant.conf on first boot. You can adjust WiFi-settings
in Raspbian by editing this file.You may have multiple
network={...} entries for multiple WiFis.
The terminal

The terminal is the main interface to the system of your Raspberry Pi. You can browse its file system, edit files and run commands. If you are logged in by SSH or running Raspbian headless, the terminal is your only interface. But even if you are using a window manager, you often will have to run commands in a terminal. Here are some hints and commands how to use the terminal.
Working with the terminal
When you open a terminal - often also called shell - you are located in your user directory, usually the home directory of the user pi. Working in the terminal, you are always located in a directory, called the working directory. Type the command
> pwd/home/pi.In Linux, file paths use the
/ symbol to separate directories. Special directories are the
root directory /, your home/user directory ~, your current working directory . and parent directory of
your current working directory ...
There are several convenience keys when using the shell. Hit the Tab button to auto-complete commands and filenames. Use the Up- and Down-Arrow keys to recall the latest commands.
Useful commands
Commands usually have various options. Most commands are described by man-pages. If no man-page exists, try to run the command with the flag --help. Please refer to this help system, if you require a command to behave differently.
# show manual page for command
man command

# list elements of a directory (working directory if no directory specified)
ls directory_name

# list also hidden elements of a directory
ls -a

# list elements of a directory with lots of information (permissions, filesize...)
ls -l

# change directory, e.g. 'cd ..' will change to parent directory
cd directory_name

# create directory
mkdir directory_name

# delete directory
rmdir directory_name

# copy file
cp file_name copied_file_name
cp file_name directory_to_copy_to

# rename or move file or directory
mv file_name new_file_name
mv file_name directory_to_move_to

# delete file (deletions are permanent, no trash bin here!!)
rm file_name

# file editor running in the terminal
nano file_name

# show configuration of network devices, e.g. to get
# IP address of WiFi (wlan0) or ethernet (eth0) module
ifconfig
Security
When your Raspberry Pi is exposed to the public, you are responsible for securing your device. There are many ways to attack or hack a device like the Raspberry Pi that are impossible to account for. However, you should prevent the most trivial ways to get into your Pi. While changing or destroying your work is annoying, the device may be used to attack others.
Here is a list of issues that you should account for:
- Make sure that your device is physically inaccessible. This prevents access to your SD card (or swapping in another SD card), to the USB and network connectors.
- Change the default password.
- Substitute readable WiFi passwords with keys.
- Disable WiFi and/or Bluetooth if not used.
Change default password
Change the default password by typing the following command in a terminal:
> passwdRemove readable WiFi passwords
WiFi passwords are stored in readable form. Please substitute the readable passwords with keys that are generated by the following command:
> wpa_passphrase MyWifiSSID MyPassword/etc/wpa_supplicant/wpa_supplicant.conf file.
Don't forget to delete the readable password. network={
ssid="MyWifiSSID"
#psk="MyPassword"
psk=bd50bf1bf2b27d2c6cfcc0aec0145007d4bfb8beb259314f377870d4bd66d003
}Disable WiFi and Bluetooth
If you don't require WiFi and/or Bluetooth it is safest to disable those services. The easiest way to disable them is to edit the file
/boot/config.txt and add the following lines. (A version of Raspbian not older than 2017 is required)
# disable WiFi
dtoverlay=pi3-disable-wifi

# disable Bluetooth
dtoverlay=pi3-disable-bt> sudo systemctl disable hciuartInstalling software (aptitude)
Raspbian comes with the package manager aptitude, which lets you install additional software. The package manager keeps track of all software installed and handles all dependencies, i.e. software (libraries, binaries etc.) that a software depends on.
Update
Before you install any new software, you should update the list of available packages:
> sudo apt-get update> sudo apt-get upgradeInstallation
Now you can install new packages, e.g. the mediaplayer mplayer:> sudo apt-get install mplayerRemoval
If you would like to remove software, you have different options what to remove:Remove only the package, but not configuration or package data. Also does not remove dependencies:
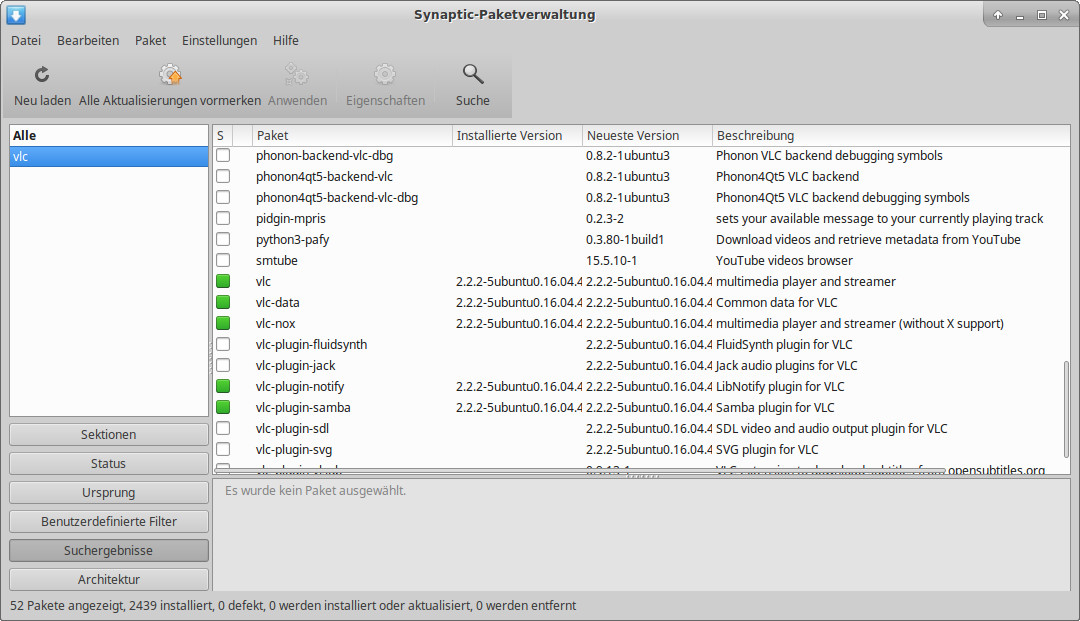
> sudo apt-get remove packagename> sudo apt-get purge packagename> sudo apt-get autoremoveSynaptic - a GUI for aptitude
 If you run Raspbian with a window manager, you can install Synaptic, which is a graphical user interface to aptitude.
With Synaptic you can search, install, remove and manage your packages in a nice graphical utility. Install with
 > sudo apt-get install synapticUseful software
usbmount
Data like media files that are stored on a USB device can be changed in the most convenient way. Many projects thus benefit from
data on a USB device, which have to be mounted manually.The usbmount utility mounts a USB device automatically to /media/usb.
Install the usbmount package with the following command.
> sudo apt-get install usbmount
Fix for Raspbian Stretch
On Raspbian Stretch, you need to fix an issue with filesystem namespaces:
Create a directory and file /etc/systemd/system/systemd-udevd.service.d/myoverride.conf and edit the content of the file to contain
[Service]
MountFlags=shared> sudo service systemd-udevd restarthttps://unix.stackexchange.com/questions/330094/udev-rule-to-mount-disk-does-not-work/330156#330156
git
git is a revision control system. A revision control system tracks changes in files, usually source code files. You will often use it to download code, mostly from https://github.com. If you get more into coding, you should look into git further, as it helps you managing your changes. No more copying, renaming and accidently overwriting files ;)> sudo apt-get install gitomxplayer
omplayer is a commandline media player developed for Raspberry Pi. It uses hardware acceleration and is the most performant player on Raspberry Pi. Use this player when possible for simple video or audio projects.> sudo apt-get install omxplayermplayer
mplayer is a commandline media player. Performance on Raspberry Pi does not match omxplayer, but allows more control and more formats. Use this player if you need more control in your video or audio project.> sudo apt-get install mplayerAdafruit's video looper
Adafruit's video looper is the way to go if you need a device that simply loops one or more videos.
It is not a package that you can install with aptitude. You need to download a install script that installs dependencies and the
video looper software.
Please follow the instructions on Adafruit's website:
https://learn.adafruit.com/raspberry-pi-video-looper/overview
If you have your Raspbian already up and running, you can jump to the install command section:
https://learn.adafruit.com/raspberry-pi-video-looper/installation#install-commands-2-11
GPIO
The Raspberry Pi has two rows of GPIO (General Purpose Input and Output) pins. These pins can be used to attach buttons, LEDs or other electro-/mechanical parts and sensors. Using GPIO the Raspberry Pi can interface its environment. You can build custom user interfaces for your audience or measure the state of its surroundings using elaborate sensory.
Pinout
The GPIO pins provide bi-directional digital input and output,
PWM,
I2C,
SPI and
UART as well as some power
and ground pins.
The pinout image below is from Element14, one of the Raspberry Pi manufacturers, and shows both pinouts for early early models with 26 pins
and latest models with 40 pins. The upper pins correspond to the pins in the corner of your Raspberry Pi board.
The image was found on Sparkfun's website, which is well worth a visit as it provides more detailed information:
https://learn.sparkfun.com/tutorials/raspberry-gpio/gpio-pinout
The logic voltage is 3.3V! Do not apply voltages > 3.3V to the GPIO pins, e.g. from the 5V power pin or microcontroller boards like Arduino.

How to use GPIO in Python
Raspbian comes preinstalled with Python and the Python module RPi.GPIO, which provides functions to use GPIO.
Here is a summary of RPi.GPIO functions:
# import GPIO module
import RPi.GPIO as GPIO


# set pin numbering mode:
# GPIO.BOARD: Use consecutive pin numbering
#             = the number in the Pin# column in the pinout image
# GPIO.BCM:   Use numbering used by the Broadcomm chip
#             = the number in GPIO** in the NAME column of the pinout image

GPIO.setmode(GPIO.BOARD)


# set pin mode to output, input, input with pullup/-down resistor
GPIO.setup(11, GPIO.OUT)
GPIO.setup(13, GPIO.IN)
GPIO.setup(19, GPIO.IN, pull_up_down=GPIO.PUD_UP)
GPIO.setup(21, GPIO.IN, pull_up_down=GPIO.PUD_DOWN)

# set output value
GPIO.output(11, GPIO.LOW)
GPIO.output(11, GPIO.HIGH)

# read input value
if GPIO.input(13):
    print("Pin 13 is HIGH")
else:
    print("Pin 13 is LOW")


# setup PWM with frequency of 1000Hz
# only pin 12/18 (BOARD/BCM number) is capable of PWM
pwm = GPIO.PWM(12, 1000)

# start PWM with 50% duty cycle
pwm.start(50)

# change duty cycle to 75%
pwm.ChangeDutyCycle(75)


# free GPIO resources after you are done
# for other processes to use GPIO
GPIO.cleanup()https://learn.sparkfun.com/tutorials/raspberry-gpio/python-rpigpio-api
Autorunning a program
Often you would like to run a program at the end of your Raspberry Pi's boot process. This is especially useful for exhibitions, where your system is shut down at night an powered again the next day. You have several options to run scripts automatically.
Autorun after boot
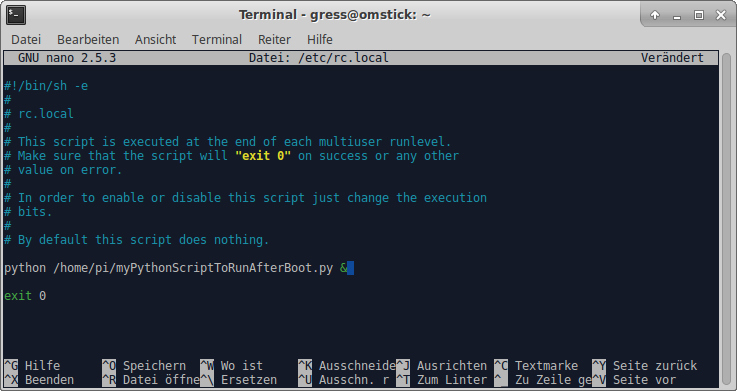
To run a script or command after boot, edit the file /etc/rc.local.
> sudo nano /etc/rc.local Note the
 & symbol after the command. Appending this symbol
will make the command run in background and control is returned to the user immediately. If you don't run the command in background, control is returned
not before the command has finished. This means that the boot process is blocked and you may not be able to log into your Pi locally. Which may not
necessarily be a problem. Be aware of this behavior and use the & symbol when possible while developing.
Autorun on logging in to a terminal
You can run a command, when you log in to a terminal by editing the hidden file .bashrc in a user's home directory, in our case
the user pi. The procedure is equivalent to editing rc.local for autorun after boot.
> nano ~/.bashrcAutorun on logging in to a desktop
You can run a command, when you log in to a desktop by editing the hidden file .Desktop in a user's home directory, in our case
the user pi. The procedure is equivalent to editing rc.local for autorun after boot.
> nano ~/.DesktopConfiguring audio output from commandline
You can control the audio output of your Raspberry Pi from commandline, e.g. previous to running
a program after boot where you would add the following commands to the /etc/rc.local
file.
Configure output device
Set HDMI as output device:
> amixer cset numid=3 2Set headphone jack as output device:
> amixer cset numid=3 1Set automatic selection (default):
> amixer cset numid=3 0You can also set the audio output device using
> sudo raspi-configConfigure volume
Set audio device volume:
> amixer set PCM 99%Multi-channel audio over USB audio interface
You can use a USB audio interface to add multi-channel output to your Raspberry Pi project. We successfully used a Behringer UMC404HD (4 channels) and a GIGAPort HD+ (8 channels). A good hint if your interface runs on a Raspberry Pi is that if you require to install a driver on Windows or Mac it probably won't run on the Raspberry Pi.
If you need a recommendation on audio software to create multi-channel audio files, try the free tool Audacity. In Edit->Preferences->Import/Export you can enable a custom mix when exporting tracks to an audio file.
Audio interface information
There is manifold information about audio devices. Raspbian uses ALSA
to manage sound interfaces. A discussion of ALSA is way beyond the scope of this cheat sheet. However, we have to be more specific about terminology.
In ALSA your audio interface is called a card, a card can have multiple devices, which again have subdevices.
You can gather information about connected hardware using the aplay -l command in the terminal:
> aplay -l

**** List of PLAYBACK Hardware Devices ****
card 0: ALSA [bcm2835 ALSA], device 0: bcm2835 ALSA [bcm2835 ALSA]
  Subdevices: 7/7
  Subdevice #0: subdevice #0
  Subdevice #1: subdevice #1
  Subdevice #2: subdevice #2
  Subdevice #3: subdevice #3
  Subdevice #4: subdevice #4
  Subdevice #5: subdevice #5
  Subdevice #6: subdevice #6
card 0: ALSA [bcm2835 ALSA], device 1: bcm2835 IEC958/HDMI [bcm2835 IEC958/HDMI]
  Subdevices: 1/1
  Subdevice #0: subdevice #0
card 0: ALSA [bcm2835 ALSA], device 2: bcm2835 IEC958/HDMI1 [bcm2835 IEC958/HDMI1]
  Subdevices: 1/1
  Subdevice #0: subdevice #0
card 1: HD [GIGAPort HD+], device 0: USB Audio [USB Audio]
  Subdevices: 1/1
Subdevice #0: subdevice #0Configure volume
Set the volume of your audio interface by specifying your card's index:
> amixer -c 1 set PCM 99%Play multi-channel audio
The sophisticated media player mplayer can be run with specifying an ALSA device for output. For the example above you would run mplayer with the following command, where hw=1.0 is for device 0 on card 1:
> mplayer -ao alsa:device=hw=1.0 -channels 8 my_eight_channel_file.wavaplay -L.
Here are two shell scripts ready to run on your Raspberry Pi:
Save the one you like to your Raspberry Pi. Adjust channel number, audio file path and card index to your needs. Make it executable by typing
> chmod 755 play_multichannel_loop.sh/etc/rc.local file for autostart, see Autorun after boot. You don't
need to call python here as the shell scripting language is understood by the terminal naturally.
Links